Quick Start to Bitcoin Self Custody

This week, I wanted to outline step by step the process for setting up a cold storage hardware wallet and also setting up a low cost way to buy Bitcoin that can be transferred on a regular basis to your hardware wallet. As I have written before, self-custody is one of the greatest features of Bitcoin and everyone who is comfortable enough to do it should try to have some if not all of their Bitcoin held in this way. Recent world events (Canada Trucker supporters bank accounts being frozen, freezing of Russia's foreign currency reserves) certainly support the notion that self-custody of your assets is the only way to ensure they are not confiscated without due process. I don't have any sponsorships and you don't need to feel like you have to use the specific products I recommend, but being an accountant and not liking to spend a lot of money, I was mostly going for low cost and simple use in mapping this out. If you're interested and prefer an audio walk through, I also included this same content in my weekly Building a Financial Fortress podcast this week located here.
Ledger Nano S Hardware Wallet Setup
I looked on Amazon for the cheapest hardware wallet and found a Ledger Nano S for $59 on Prime and got it in a couple of days. I already completed the setup for this wallet and this is my second one (previously setup a Trezor Model T hardware wallet). I found that the process was overall very easy and simple to follow, but of course it helped to have had some experience with it. Here is the step by step instructions:
Make sure you have the following:
Ledger Nano S with supplied micro USB cable
Computer with at least Windows 8.1 (64-bit), macOS 10.10, or Linux with internet connection
The Ledger Live application downloaded and installed on your computer
Set up as a new device
Connect the Ledger Nano S to your computer using the supplied USB cable. Your device should display "Welcome to Ledger Nano S." You should contact Ledger if the device immediately asks you for a PIN code, as it may not be safe to use.
Press the left or right button to navigate through on screen instructions
Press both buttons at the same time to choose the options "Set up as new device"
Choose your PIN code
Press both buttons when "Choose PIN code" is displayed on the device (choose a unique code that you can easily remember)
Press the right or left button to choose the first digit of your PIN code
Press both buttons to enter / accept a digit
Repeat the process until you've entered 4 to 8 digits (8 digits is recommended for optimal security)
Select the checkmark icon and press both buttons to confirm the PIN code. Use the backspace icon to erase a digit.
Confirm your PIN code by entering it once more
Write down your recovery phrase
Your 24-word recovery phrase will now be displayed one word at a time on the Ledger Nano S screen.
The recovery phrase is the only backup of your private keys and will be displayed only once.
Take the blank Recovery sheet supplied in the box and a pen
Write down the first word (Word #1) on the Recovery sheet. Verify that you have copied it correctly in position 1.
Press the right button to move to the second word (Word #2). Write it in position 2 on the Recovery sheet. Verify that you've copied it correctly. Repeat the process until the twenty-fourth word (Word #24).
Press both buttons to "Confirm your recovery phrase" when complete
Select the requested words by navigating with the left or right button. Validate each word by pressing both buttons. Repeat this step for each requested word.
Your device will display "Processing" and then "Your device is now ready" once you've successfully completed the setup process.
Press both buttons to access the "Dashboard." The Dashboard is where you can access the apps and settings on your device.
Some security tips:
Anyone with access to your recovery phrase could take your assets, so store it securely
Ledger does not keep a backup of your 24 words
Never use a device with a supplied recovery phrase or PIN code
When in doubt contact Ledger Support
Congratulations, your device is successfully setup. The next step is to install apps from the Ledger Live app and add an account (we will install the Bitcoin app and wallet account). Follow the prompts in the Ledger Live app to complete this step and once done you will be ready to send and receive Bitcoin!
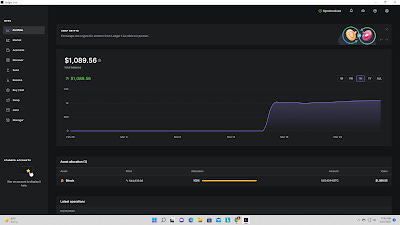
Below is a screen shot of the Ledger Live app. You can see the menu on the left side where you can send or receive coins, setup new wallet accounts and even buy coins:

Strike Account Setup, Buy and Send Bitcoin to Hardware Wallet
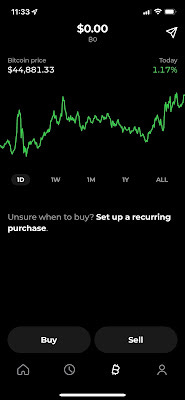
Next we need to setup your Strike app on your phone. Strike is a Bitcoin and payment app that facilitates global payments at zero cost by using the Bitcoin Lighting network. You can buy Bitcoin on the app at market prices for zero fees. This can add up over time. For example, Coinbase charges a 1.5% fee for each purchase so why not stack more Bitcoin over time versus paying the fee? Also, I have checked the market prices between Coinbase and Strike and they are very close which means you aren't paying any more of a "spread" to actual market prices by using Strike. I also like the user interface which is very simple and clean. Here's a screenshot below:

Download Strike app on your phone
Click on the far right icon and add a payment method - I'd recommend a checking account and complete the setup prompts
You'll notice on that same screen that you can also setup direct deposit of all or a portion of your paycheck to Strike and you can "pay yourself in Bitcoin" if you want by coupling that with a recurring Bitcoin purchase
Next, click "Deposit" on the same screen and you'll have to enter an amount. Note that for bank accounts the limit per deposit is $1,000 but there is no fee charged.
Then go to the second icon from the right and there you can buy (or sell) one time or setup a recurring purchase hourly, daily, weekly or monthly.
For now, just buy a small amount - say $50 - $100; once you complete your purchase you will have Bitcoin in your Strike wallet
Next, click on the arrow icon in the upper right corner of the same screen.
Open your Ledger Live app on your computer and make sure your hardware wallet is connected and logged in. On the left side menu select "Receive" and a Bitcoin address should show up on your app and on the device. I like to check both to make sure they match before sending. Then you select the QR code option and the app will display the code for the address.
Take your phone with the Strike scan window open, scan the QR code and it should copy into Strike. I also like to check the address one more time in Strike before I send just to make sure it matches.
Then hit send. You should see the transaction show up unconfirmed in your Ledger Live app in a minute or two and it may take up to 10 minutes for the network to confirm the transaction. I usually wait to close everything out until I have at least one confirmation.
As far as amounts to transfer, assuming you bought $100, you may want to do your first transfer with a small amount like $10 or $20 until you are comfortable that it "works." That's what I did at first, but now I can confidently send any amount between my wallets at any time. Note the Bitcoin network fees will be quite high as a percentage of the transfer for very small amounts, but they are relatively tiny for larger amounts being transferred.
The best strategy is to setup a recurring buy and then periodically (more frequently with larger recurring purchases and less frequently with smaller purchases) send the coins to your hardware wallet for cold storage - as mentioned above, Strike has many options for periodic purchase to help dollar cost average your Bitcoin buys and given Bitcoin's volatility, this is the best way to accumulate coins for the long term investor
I have written several posts on the subject of Bitcoin in my blog, but if you're just getting started the best one is Why Invest in Bitcoin. I also have an episode of my podcast dedicated to that here.
As always, do you own research and consult with your financial advisors before making any investment decisions. This is not investment advice.
I hope you find this post useful as you chart your personal financial course and Build a Financial Fortress in 2022. To see all my books on investing and leadership, click here.
Always remember: freedom, health and positivity!


